Sunset over Santa Clara County Hills

Copyright © 2015 Deborah M. Zajac. ALL RIGHTS RESERVED

Another little tree alone on a hill.  This is an image I made a couple of weeks ago.  It was a lovely evening: warm, with a cool breeze, and the color glowed in the sky for hours; until well after dark. A rare thing around here.

Sunset over Santa Clara County

This image is a composite made from two frames blended in Photoshop CS6.

Nikon Df| AF-S Nikkor 17-35@30mm| ISO 100| Manual Priority| Tripod| Singh-Ray 2 stop Reverse Grad ND + 3 stop Grad ND filters

More to come…

Under Scorpio’s Light

Copyright © 2015 Deborah M. Zajac. ALL RIGHTS RESERVED

In 2012 I shot my very first Milky Way Pano. I’ve not yet posted it…it is still a work in progress.   Since then I’ve been wanting to improve on the techniques I used in 2012 which was…I won’t lie, ” flying by the seat of my pants”.

One of the things I want to improve is getting better stitching. Even using a tripod,  and generous overlapping I wasn’t happy with the stitching.  I hoped that by calibrating my lens to find the Nodal Point, or No Parallax Point I would get better stitching results.  What is the Nodal Point and why does it matter you ask?  Do this. Hold up your thumb or pen in front of your face at arm’s length, and move your head from left to right. Notice how the background moved on one side more than the other? That’s Parallax. If you were to take two images one from the left and one from the right side and merge them the line would not be straight.  You need to either have the point of view of the pen or the background.

For a great explanation to solve this issue I turn to John Houghton, ” Ideally, therefore, when taking the photographs for a stitched panorama you need to take all the shots from a single viewpoint so that near objects don’t change their position against the background in successive shots.  This will greatly ease the task of  joining the images seamlessly to form a perfect panorama image.  Hence, the “eye” of the camera needs to be kept in a constant position when the camera is rotated to point in a different direction for each shot. “~ John Houghton

Yesterday afternoon I figured out the Nodal Point, or No Parallax Point for my 24mm f/2.8 lens.  I mounted my camera  on my macro rail, and a tripod. Making sure that tripod was level, next making sure my camera/macro rail were level,  then I lined my tripod rig up with a light stand placed a few feet away from the tripod, and a pole I have in the backyard which is further away from the light stand.

Loosening my panning knob on the ball-head I moved the camera/micro rail left and right and could see the furthest pole on both sides of the light stand I had parallax. Then I moved my camera back to the center point moved my camera back using the macro rail adjustment knob. I locked it down and moved my camera right and left again…the parallax got worse telling me I needed to make my adjustment on the rail in the other direction. I loosened the rail and moved the other direction a bit then moved the camera from left to right, and saw I was getting there; I only saw a little bit of the further pole behind the light stand now.   One more small adjustment and Voila! I didn’t see the further pole behind the light stand when panning the camera left and right.   I found the Nodal Point, or No Parallax Point of that lens!

My rail has centimeter, and millimeter marks so I made a note of the number that 24mm f/2.8 lines up with to be able to quickly set up a panorama shot with that lens again.

Now that I had found the Nodal/No Parallax Point I was anxious to test it out. The sky was supposed to be clear so I met a friend at a favorite Night Sky spot to shoot the Milky Way. My goal was to make a Vertorama/Panorama using my new measurement of the Nodal Point.

In the Light of Scorpius

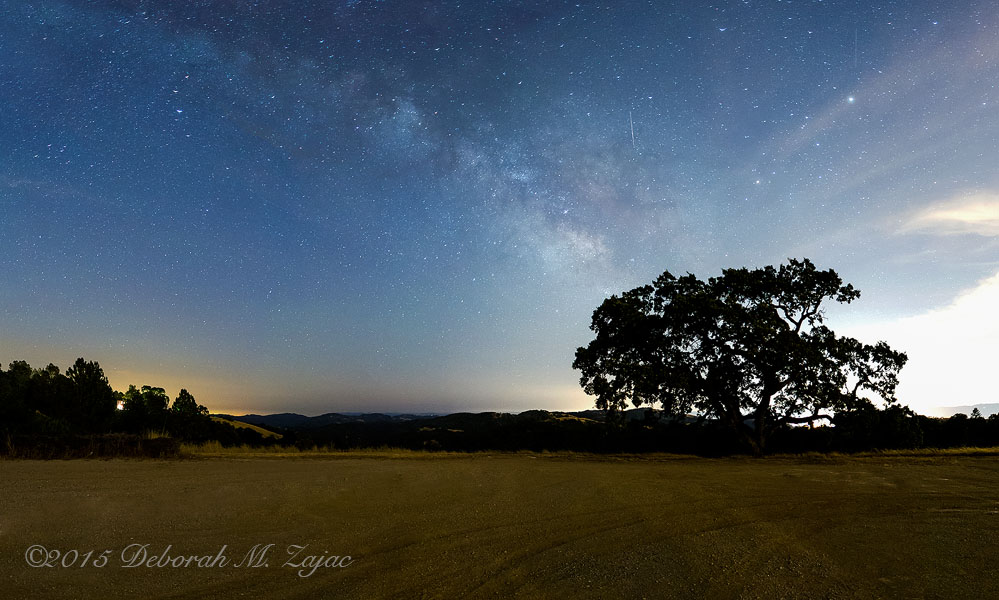
I made 7 images from left to right making sure my tripod was level, my camera/macro rail were level, and that I had a lot of overlap when panning from shot to shot. Then I returned to the same place I started and panned up a bit to get more of the sky in the frame making sure I had plenty of overlap then moving left to right using the same amount of movement as before I made 7 more images ending exactly at the same place as before. (Note- When I composed the shot  I noted the degree marking on my ball-head to find my starting place and I noted the degree mark for my ending place, so I knew where to start and end for the second row. )

The clouds moved in and when they hit the city lights below they really lit up! I’ve cropped off a bit from that right side.  It was a fairly early night due to the clouds.

It’s important to note that each lens has its own Nodal/ No Parallax Point! Prime lenses are easier to figure out because you only need to make one measurement, but if you’re using a Zoom lens you’ll need to figure out the Nodal/No Parallax Point for each focal length you’ll use.

For example, I use my 17-35mm AF-S Nikkor wide-angle lens a lot so I’ll be spending some time this afternoon finding the Nodal/No Parallax Point for that lens at 17mm, 20mm, 24mm, and 35mm. I’ll also find the Nodal/No Parallax Point for my 16mm fisheye lens.

I’ll write down each measurement for each lens on my cell phone’s notepad, along with which camera was used, and I’ll upload that information to my computer so I have it there as a back-up as well.

Initial development of the images was done using LR5. Then I stitched this image in Photoshop CS6. Due to the light variation I had some seams showing. I clicked on each layer and using the clone brush fixed those.

All in all I think a very successful endeavor.  I hope next week-end has a clear night so I can get out and do this again.

14 Frames w/ Nikon Df| AF-D Nikkor 24mm f/2.8 @ f/2.8| 15 seconds| ISO 6400| Manual Priority| Mirror Up| Tripod| Cable Release

P52 28/52 No Boil Spaghetti

Copyright © Deborah M. Zajac. ALL RIGHTS RESERVED

I wanted to make #1 Grandson spaghetti because he asked me for it, but thinking about it I wasn’t really comfortable using a whole stockpot of water to boil the pasta then dump the water down the drain. Since I live in CA and we’ve got mandatory water restrictions in place it just seemed wasteful to me.  I couldn’t think of anything else to do with the used water.

But,  I thought, ” I’ve tried a No Boil Lasagna recipe and liked it, so why not try Spaghetti too?”

I dug out my crock-pot which is my favorite method for making sauce and crumbled in some leftover meatloaf, poured in 2 jars of my favorite sauce, doctored it up with some Italian herbs, and a half cup of so of water, and set the crock-pot on low to cook all afternoon.  40 minutes before the sauce was done I added a pound of raw spaghetti broken in half to the crock-pot along with another jar of my favorite sauce and enough water to clean out the jar. Stirred in the pasta so it was well coated  in the sauce, replaced the lid and let it cook for 40 minutes more.

No Boil Spaghetti

It’s delicious! The sauce is super thick, and the pasta was cooked through.  He-Man, and #1 Grandson loved it. Both had seconds!

I had some for lunch today and as you  would hope it’s even better today.

I’m glad that worked out, and I saved some water too.

Nikon Df| AF-D Nikkor 105mm| Hand-held| Hoodman STEEL Ultra High Speed Digital Film| CS6

1 more…

Baked Smores

I made #1 Grandson his first smore- I baked it in the toaster oven rather than a campfire. He loved it too, and was a right mess after eating the whole thang! . 🙂

More to come…

Monochrome Madness 2 18/52: The Wrangler

Copyright ©2015 Deborah M. Zajac. ALL RIGHTS RESERVED

This is an image from the Rodeo I attended recently. He has a great face for photography I thought.

Monochrome Madness 2 18 of 52 The Wrangler

It’s already week 18 of Monochrome Madness2! Time seems to pass so quickly each week. I barely made my entry to the challenge these last two weeks.  I hope you have some time to click over to Leanne’s site and view the other entries. I’m sure you’ll find something you like, and lots of inspiration.

Nikon Df| AF-D Nikkor 80-200mm| @145mm| f/6.3| 1/1250s| ISO 400| Manual Priority| Hoodman STEEL Ultra Digital Film| Hand-held

More to come…

Impatiens – watercolor

Copyright ©2015 Deborah M. Zajac. ALL RIGHTS RESERVED

Inspired by a watercolor by Jodi Jensen that I own, and fellow blogger   http://createarteveryday.com/  I pulled out my Watercolor paints yesterday evening to paint some Impatiens.

Here’s V1

Impatiens I Watercolor

Not happy with the top of the pots, and the floor, anchoring ground I flipped the card over and began anew-

V2

Impatiens II Watercolor

I am happy that I was able to get the tile floor to look like a floor, and the pots came out better, but one pot is still a bit wonky. Perspective in drawing and painting isn’t coming easily to me.

I didn’t like the big green bush on the right so, I wet my wash brush and went over the entire painting muting the flowers, bush, and pots, and after it dried I started again.

V3

Impatiens III Watercolor

The pot on the right is still wonky in shape, but I like the softer, more muted edges, and the greenery in the background I find more pleasing.  There will be a V4 on another day.

I found the an image online (Yahoo Images) of the Watercolor by Jodi Jensen that I own and have hanging in my family room which was my image source of inspiration.  My watercolor is quite different.  🙂 I hope to be this good one day!

Jodi Jensen Watercolor ImpatiensThank you Laura for putting your art out in the world for me and others to be inspired by your challenges, successes, and words of encouragement!

iPhone 5| CS6| Winsor & Newton Watercolor Paints| Strathmore Watercolor Cards|Colors I used: Cadmium Red, Alizarin Red, Ultramarine Blue, Cadmium Yellow, Sap Green Burnt Sienna, and Burnt Umber| Brushes-Simply Simmons 1″ Flat, Artist Loft Vienna #10, American Painters Round #8, and Robert Simmons fine line 10/0-

More to come…

P52 27/52: Treasures from the Trail

Copyright © 2015 Deborah M. Zajac. ALL RIGHTS RESERVED

My hike today turned into a treasure collecting hike. I found lots of trail glass in colors of green, brown, and clear, a little pebble, a little silver button, a penny gleaming off the trail in the bush; my pocket was getting full! Then on the way down I found these little acorns laying in the trail and had to scoop them up too. I carried them in the palm of hand more than a mile down the trail to my car.

When I got home I got out my tripod, Camera, and Speedlights and set about making some images of what I found.

P52 27 of 52 Treasures from the TrailI love this little pick of acorns!

P52 27 of 52 Treasures from the Trail

I wasn’t planning to post twice today, but I suddenly realized I hadn’t posted my image for my Project 52 this week, so these found treasures that made me smile, lightened my heart, and made the hike even more joyful get that honor instead of the image of a rose with a bee that I meant to post yesterday.

Nikon Df| AF-D Nikkor 105mm Macro lens| Tripod| SB910, SB600, triggered with an SU800|

I hope you all are having a lovely week-end!

More to come…