July’s Buck Moon

Copyright ©2016 Deborah M. Zajac  ALL RIGHTS RESERVED

The July Full Moon is called the “Buck Moon” in North America because male Deer are usually beginning to grow their antlers again in July.
The July Full Moon also has two other names. The Hay Moon; July is when Farmers begin storing their Hay, and the Thunder Moon because of the many thunder storms in the month of July.

I made this image in Santa Cruz, CA. The Moon looks large because it’s close to the horizon. Being on the coast there was a lot of moisture/atmosphere in the air, and the fog was slowly rolling in from the southeast so, the Moon looks a bit diffused.

The Moon was so pretty in the pink reflected light of the Belt of Venus. The pink part of the sky after sunset is called the Belt of Venus. It’s a phenomenon that happens after sunset and before sunrise. “The dark band of the Earth’s shadow at dusk and dawn often has a light pink arch above it, known as the Belt of Venus. It extends about 10-20 degrees up from the horizon, acting as a boundary between the shadow and the sky. The effect is due to the reddened sunlight being backscattered in the atmosphere, which produces the rosy glow.”~http://www.howitworksdaily.com/what-is-the-belt-of-venus/

Full Buck Moon

as the Moon rose higher it began to turn more Golden.

Full Buck Moon Twilight

Then it was time to head home.

Nikon Df| Nikkor 200-500mm| Delkin Digital Film| Tripod

More to come…

Top 10 2015 Images

Copyright 2015-2016 Deborah M. Zajac. ALL RIGHTS RESERVED

Last week I shared with you the Top 10 Images that received the most  views over on my flickr site today I’m going to share with you My Personal favorite images from 2015. Most of these I posted on the blog, so you’ll probably recognize them or feel a sense of Deja-vu. 🙂

I selected these images based on emotions, technical merit, or because I met a personal goal. I got my picks  down to 36 then spent a couple of days whittling those down to just 10. It’s so hard! I have an emotional attachment to all of them. 🙂

Without further ado…My Personal Top 10 Images of 2015:

1)Running in Rain Puddles.  He’s just awesome, and brings me so much joy. I love being a Grandma!!

Running in Puddles

2) Milky Way over Mt Shasta- This was an Epic night spent with Dear Friends. I hope we are able to get together to shoot here again this year.Milky Way over Mount Shasta CA, USA

3) Total Lunar Eclipse over the Palace of Fine Arts San Francisco- This was another epic night. There was weeks of planning, chasing the Moon across town from one location to this one, working the camera to get the shots all the while hoping it would all come together in post production.  It’s pretty great when it does. Totality-Lunar Eclipse over The Palace of Fine Arts San Francisc

4) Cooper’s Hawk- I think.  There are a few  images in this selection that I haven’t shared before. More times than I care to admit I find I lack the confidence that a certain image I love will be well received, or what happens to me quite a lot is that I’m not crazy about the images when I first upload them after a shoot so, I let them marinate awhile. When I return to them months or years later I find I like them a whole lot more.

This Hawk in the reeds in Sacramento National Wildlife Refuge is an image I really like, but thought it might be too pedestrian to post back in January 2015 when I photographed it.  I love its face, the clarity of the eye, the natural environment, and the fact that I was able to make the image before it flew away.

Cooper's Hawk

5) Northern Flicker-Male – Another image never shown before today. This bird has been a nemesis of mine for years! They too are flighty.

I’d read reports of him being spotted in a neighborhood not from me in Jan/Feb. 2015, so one day a friend and I went looking for him. We found him deep in the shadows of this tree.  Once I got it uploaded and did some post production work to open up the shadows I was happy with the image, and feel like I can say it’s not my nemesis anymore.  They’re such beautiful birds.

Northern Flicker

6) Salsify macro- This was an image I photographed for my Project 52/2015 using my LensBaby Composer Pro wit the macro adapters. I love my LensBaby System and that creamy background. Salsify

7) Still-life “Why fit in when you were born to stand out.” Dr. Seuss

This one makes the cut because I got the lighting, and composition that I wanted to make right.

P52 29 of 52 "Why fit in when you were born to stand out?" ~Dr.

8) Orange Crowned Warbler.   I haven’t seen this little bird too often and photographing them is so hard; they’re small, and are so fidgety you have to be quick. This particular morning I set up my rig by a seep that was drawing in birds from the area for a drink.  Patience when birding is essential. It paid off this morning. I waited 30 minutes or so for this bird to come to the seep. This is the best image I’ve made of this species.

Orange Crowned Warbler

9) Great Egret-  Another bird image I’ve never before shared.  I love the colors, and how clear its eye is.

Great Egret

10)Sunrise cresting San Francisco Skyline from Kirby Cove. It was worth the mile hike back up for this image. Being there was awesome.

Sunrise over San Francisco CA

These are my favorites from 2015.  Thank you for being so supportive, and letting me share my images with you. I look forward to seeing your images, reading your poems, thoughts, and seeing the places you travel from  my arm-chair this year.

Happy and Healthy 2016 Everyone!

More to come…


A Window to the Stars

Copyright ©2015 Deborah M. Zajac. ALL RIGHTS RESERVED

Last Saturday a friend and I went up to Yosemite to photograph the Night Sky because the Moon was rising in the wee hours of the night we’d have several hours of dark sky to photograph the Milky Way.
This is just one view of the sky that I made.

I love how many more stars one is able to see up here in comparison to the city I live in; where far fewer stars are seen due to light pollution.

I adore city life and all it’s conveniences, but I need the country and high mountains for the serenity, beauty, and dark skies. I hope we as a people in this country can appreciate the stars enough to save some land/parks for dark skies because seeing so many stars is amazing, wondrous, and so inspiring that a special kind of person has the drive and adventurous spirit to travel among them no matter what the risk! If I had the math skills required for space travel I’d be there in a nano second!

Nikon Df| Nikkor AF-S 17-35mm| Tripod| Cable Release…before I broke it-SIGH!| Hoodman STEEL Ultra High Speed Digital Film| Developed in Photoshop CS6

Under Scorpio’s Light

Copyright © 2015 Deborah M. Zajac. ALL RIGHTS RESERVED

In 2012 I shot my very first Milky Way Pano. I’ve not yet posted it…it is still a work in progress.   Since then I’ve been wanting to improve on the techniques I used in 2012 which was…I won’t lie, ” flying by the seat of my pants”.

One of the things I want to improve is getting better stitching. Even using a tripod,  and generous overlapping I wasn’t happy with the stitching.  I hoped that by calibrating my lens to find the Nodal Point, or No Parallax Point I would get better stitching results.  What is the Nodal Point and why does it matter you ask?  Do this. Hold up your thumb or pen in front of your face at arm’s length, and move your head from left to right. Notice how the background moved on one side more than the other? That’s Parallax. If you were to take two images one from the left and one from the right side and merge them the line would not be straight.  You need to either have the point of view of the pen or the background.

For a great explanation to solve this issue I turn to John Houghton, ” Ideally, therefore, when taking the photographs for a stitched panorama you need to take all the shots from a single viewpoint so that near objects don’t change their position against the background in successive shots.  This will greatly ease the task of  joining the images seamlessly to form a perfect panorama image.  Hence, the “eye” of the camera needs to be kept in a constant position when the camera is rotated to point in a different direction for each shot. “~ John Houghton

Yesterday afternoon I figured out the Nodal Point, or No Parallax Point for my 24mm f/2.8 lens.  I mounted my camera  on my macro rail, and a tripod. Making sure that tripod was level, next making sure my camera/macro rail were level,  then I lined my tripod rig up with a light stand placed a few feet away from the tripod, and a pole I have in the backyard which is further away from the light stand.

Loosening my panning knob on the ball-head I moved the camera/micro rail left and right and could see the furthest pole on both sides of the light stand I had parallax. Then I moved my camera back to the center point moved my camera back using the macro rail adjustment knob. I locked it down and moved my camera right and left again…the parallax got worse telling me I needed to make my adjustment on the rail in the other direction. I loosened the rail and moved the other direction a bit then moved the camera from left to right, and saw I was getting there; I only saw a little bit of the further pole behind the light stand now.   One more small adjustment and Voila! I didn’t see the further pole behind the light stand when panning the camera left and right.   I found the Nodal Point, or No Parallax Point of that lens!

My rail has centimeter, and millimeter marks so I made a note of the number that 24mm f/2.8 lines up with to be able to quickly set up a panorama shot with that lens again.

Now that I had found the Nodal/No Parallax Point I was anxious to test it out. The sky was supposed to be clear so I met a friend at a favorite Night Sky spot to shoot the Milky Way. My goal was to make a Vertorama/Panorama using my new measurement of the Nodal Point.

In the Light of Scorpius

I made 7 images from left to right making sure my tripod was level, my camera/macro rail were level, and that I had a lot of overlap when panning from shot to shot. Then I returned to the same place I started and panned up a bit to get more of the sky in the frame making sure I had plenty of overlap then moving left to right using the same amount of movement as before I made 7 more images ending exactly at the same place as before. (Note- When I composed the shot  I noted the degree marking on my ball-head to find my starting place and I noted the degree mark for my ending place, so I knew where to start and end for the second row. )

The clouds moved in and when they hit the city lights below they really lit up! I’ve cropped off a bit from that right side.  It was a fairly early night due to the clouds.

It’s important to note that each lens has its own Nodal/ No Parallax Point! Prime lenses are easier to figure out because you only need to make one measurement, but if you’re using a Zoom lens you’ll need to figure out the Nodal/No Parallax Point for each focal length you’ll use.

For example, I use my 17-35mm AF-S Nikkor wide-angle lens a lot so I’ll be spending some time this afternoon finding the Nodal/No Parallax Point for that lens at 17mm, 20mm, 24mm, and 35mm. I’ll also find the Nodal/No Parallax Point for my 16mm fisheye lens.

I’ll write down each measurement for each lens on my cell phone’s notepad, along with which camera was used, and I’ll upload that information to my computer so I have it there as a back-up as well.

Initial development of the images was done using LR5. Then I stitched this image in Photoshop CS6. Due to the light variation I had some seams showing. I clicked on each layer and using the clone brush fixed those.

All in all I think a very successful endeavor.  I hope next week-end has a clear night so I can get out and do this again.

14 Frames w/ Nikon Df| AF-D Nikkor 24mm f/2.8 @ f/2.8| 15 seconds| ISO 6400| Manual Priority| Mirror Up| Tripod| Cable Release

Venus and Jupiter Conjunction

Copyright © 2015 Deborah M. Zajac. ALL RIGHTS RESERVED

Venus and Jupiter are pretty close together tonight: just 1.1º.  Also visible with binoculars or a Telephoto lens are Jupiter’s Moons. Europa, Io, Ganymede, and Callisto.

Venus is the brightest low planet, and Jupiter is next brightest object diagonally above Venus. The little dots around

Jupiter are its Moons. Tomorrow they’re be even closer together, just 0.6º apart!  If I’m lucky I’ll find a spot other than my yard without tree branches in the frame. 🙂 The best time to see this is after Dusk looking West.

Venus Jupiter and Moons Conjunction_9054Nikon Df| AF-S Nikkor 300mm| f4| 1.3s| ISO 1600| Tripod| Single Frame| Developed in Photoshop CS6| Cropped in about 50%

More to come…

Monochrome Madness 2: 16/52 Road to the Stars

Copyright © 2015 Deborah M. Zajac. ALL RIGHTS RESERVED

I made this image last week-end. Unfortunately, I’ve was pretty busy last week and didn’t get to out much, or have to much time to work on images.

I added +1 EV in post development to open up the road a bit more.   I thought I’d play and try converting this image to Black &  White for this week’s Monochrome Madness 2. I like it, but I do like the color version more. I’ll share it in a future post.

Monochrome Madness 2 16 of 52 Road to the Stars

I hope you drop by Leanne Cole’s site to view the other work that was shared this week. Click here!

Nikon Df| AF-D Nikkor 17-35mm @ 22mm| 18 frames ea. 30s| ISO 400| Tripod| Manual Priority| CS6 & Silver Efex Pro 2

More to come…

Total Lunar Eclipse over the Palace of Fine Arts San Francisco

Copyright ©2015 Deborah M. Zajac. ALL RIGHTS RESERVED

I had a fun night of imaging with my friends Dali, and Andy.

We had a few venues planned because there was a possibility of fog, and a partly cloudy sky.
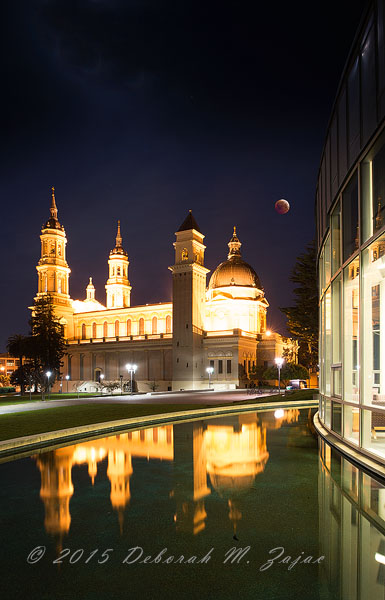
Our Plan A was to shoot the April 4th Total Lunar Eclipse over St. Ignatius Cathedral in San Francisco since this Eclipse fell on Passover and Easter Week-end it would tie in perfectly.

Starting with Plan A. We arrived just before 2AM, set up, and began shooting our images. I had planned my shooting position so that I could capture the reflection of the Cathedral in the little pond, and the glass wall of the library, but they had left the Library lights on so the reflection wasn’t good, and I didn’t think I’d be able to get the Moon reflection, but one can always hope.   We were well into our series, and talking then shortly before 4AM the lights on the Cathedral shut off. We were disappointed when that happened so, we decided to move to our Plan B position for Totality since we still had an hour to go.

We figured we would be making  at least one composite image from all we had shot already so, if we shot Totality at our Plan B location we could composite it in to an earlier image(s) from St. Ignatius for our “What If we stayed” image.

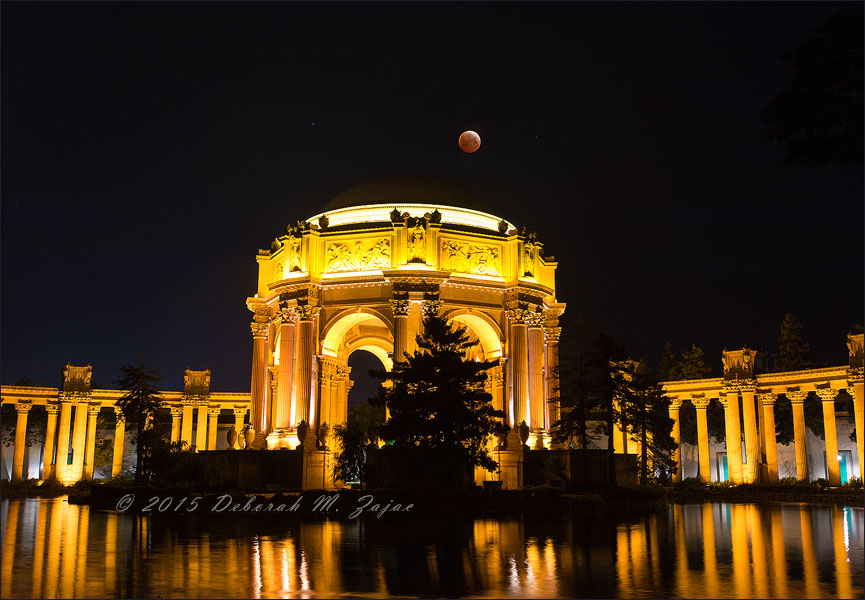
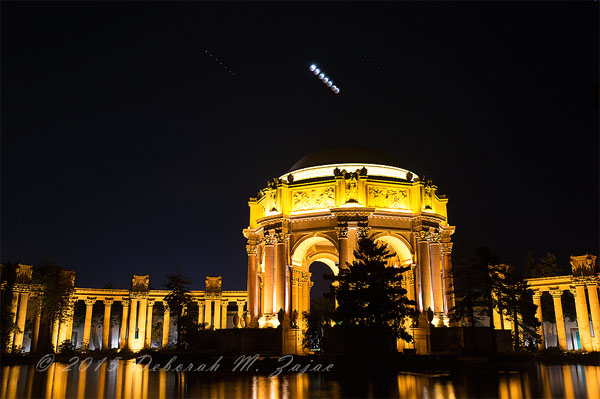
So, we moved to Plan B:  The Palace of Fine Arts. To make this image I used my Nikon Wide Angle 17-35mm lens for the foreground, and just before Maximum I quickly switched lenses to my Nikon 80-200mm lens and made several images of just the Moon in Totality with it. This image is a composite with one frame from each lens. I resized the Moon from 200mm to look the same size it did to my eye at Totality or Maximum.

Totality-Lunar Eclipse over The Palace of Fine Arts San FranciscShooting with the Wide Angle lens the magnification is so little that the Moon looks tiny. For this 3rd Lunar Eclipse in the Tetrad I wanted to have a nice foreground interest along with the Moon at Totality becasue the two prior Eclipses I focused on the Moon and used only my Telephoto lens.

Earlier I mentioned that this was the 3rd Lunar Eclipse in the Tetrad. What is a “Tetrad” you may be asking?
Lunar Tetrad
“Total lunar eclipses are rare – only about one in three lunar eclipses are total. About four to five total eclipses can be seen at any place on Earth in a decade.

Lunar eclipses usually do not occur in any specific order. However, every once in a while, four total lunar eclipses happen in a row. This is called a lunar tetrad. The total lunar eclipses happen 6 months apart. There are at least six full Moons between two total lunar eclipses in a tetrad.~ TimeandDate.com

Here’s my “What if we had stayed” composite image from St. Ignatius. 2 frames Nikon Df one frame for the foreground and one for the moon. The Moon has been resized to look how it would have looked.
What If I had Stayed Total Lunar Eclipse over St Ignatius Cathed

Here’s a partial sequence of how the Eclipse looked over the Palace of Fine Arts- This is 8 frames of the The Total Lunar Eclipse from partial to a minute until Maximum. All 8 frames were shot with the same camera, lens, and settings. I was manually timing the frames at 2 minute intervals except the last one which is about a minute from the frame before.

Nikon Df| AF-S Nikkor 17-35mm f2.8@ f8| 8 seconds| ISO 400| Tripod.

You can see how small the Moon is when shooting this close to the foreground interest with a wide angle lens. This was shot at 17mm.  Knowing how tiny the Moon would be is why I wanted to use my Telephoto lens to shoot the Moon at Maxium and composite it in in development.  The way our eyes can see a scene like this is pretty amazing. My eye saw the Moon much larger than my lens can.

Total Eclipse partial sequence over The Palace of Fine ArtsOne last image of the Moon/Eclipse at Maximum- Nikon Df| 80-200mm @200mm| f8| 0.8 sec| ISO 1250

Totality Lunar Eclipse April 4, 2015 at 200mm

Not only was it a fun night, but we were really lucky with the weather. It was windy, and chilly, but the fog stayed at sea, and there were no clouds, and I learned some things too…

-I wish I hadn’t switched lenses  just before Totality and stuck to my original thought of taking at least one image with my wide angle lens  of Totality before switching lenses so, I would have had a complete sequence to stack at the Palace of Fine Arts.

-If possible take 2 rigs and shoot long and telephoto, and/or a time-lapse.

-The lights finally clicked in my brain about focal length, and distance and how it effects the size of the Moon in the image. This knowledge will be used again, and again when I make images of the Moon in the future.

-Determine my shooting position at the venue and don’t move unless absolutely necessary. ( I moved while at St. Ignatius which messed up my sequence)

…and last but not least …we could have stayed at St. Ignatius. Our lighter images in the beginning of the series would have kept the image from being too dark once stacked into the final image.

I’m hoping we can turn all these lessons into something good in September for the fourth and last Total Lunar Eclipse in this Tetrad. That date is September 28, 2015, but for me on the West Coast (California) it’s September 27, 2015.

You can see Andy’s images from the night here, here, and here.  Dali hasn’t posted his images from Saturday night yet, but you can find his other work here. 

More to come…