Copyright ©2018 Deborah M. Zajac. ALL RIGHTS RESERVED
I mentioned in last week’s post here that my friends and I had ventured a bit further south while in the Eastern Sierras over Labor Day week-end. We went very nearly to the farthest southern end to the Alabama Hills Recreational Area. If you’ve ever watched any old Western Cowboy movies you’ve seen this area. It’s rugged, rocky, and beautiful.
Also it’s remarkable in that the road to this area is also the road that is known as Mt. Whitney Portal. One takes this road up to the staging area to begin your trek up Mt. Whitney which is the tallest mountain in the lower 48 of the United States.
There’s a very famous natural arch among photographer’s in the Alabama Hills Recreational Area that features a very nice view of Mt. Whitney. I was blessed and fortunate to photograph the arch called Mobius Arch back in 2012 just before sunrise. Mt. Whitney is framed by the arch in my image seen here. Back then no one read my blog. I am thankful for those of you who have found me since then!
For this trip I suggested a less famous, less photographed arch called Lady Boot Arch, or Boot Arch, or…it has a few other names if you do a search on the internet for it. My friends were open to the idea so we scouted it in the afternoon before the shoot, and were happy with it so we went back to town for dinner then met near the arch before sunset for an evening of photography fun. We had plenty of time to get our compositions in focus, and set up the lights to light up the arch and foreground rocks. Laura brought her warm tea lights to light up the arch interior, and I had my trusty flash light with a gel to paint the rocks in the foreground. I’m not that skilled at light painting so, I passed my torch to Laura who does have the touch, and skill in that area.
Here’s the image I made that I like best. It’s a two frame composite image. I processed the sky/milky way image from the raw file to look very close to how it looked that night, and blended it with an image of the foreground light painted to highlight the rock formations and lighted arch. I was hoping to get one image that had both sky and foreground close enough to what I saw to be able to edit and develop that, but sadly I didn’t have one with the foreground just right. Which is why you light paint more than you think you need, and plan on blending frames if needed. I’m chuffed ( read delighted! for those that don’t get British English slang) with the result. It was super fun to shoot, and I would do it again in a nano second! I hope you like the tale, and image nearly as much as I had fun making it.
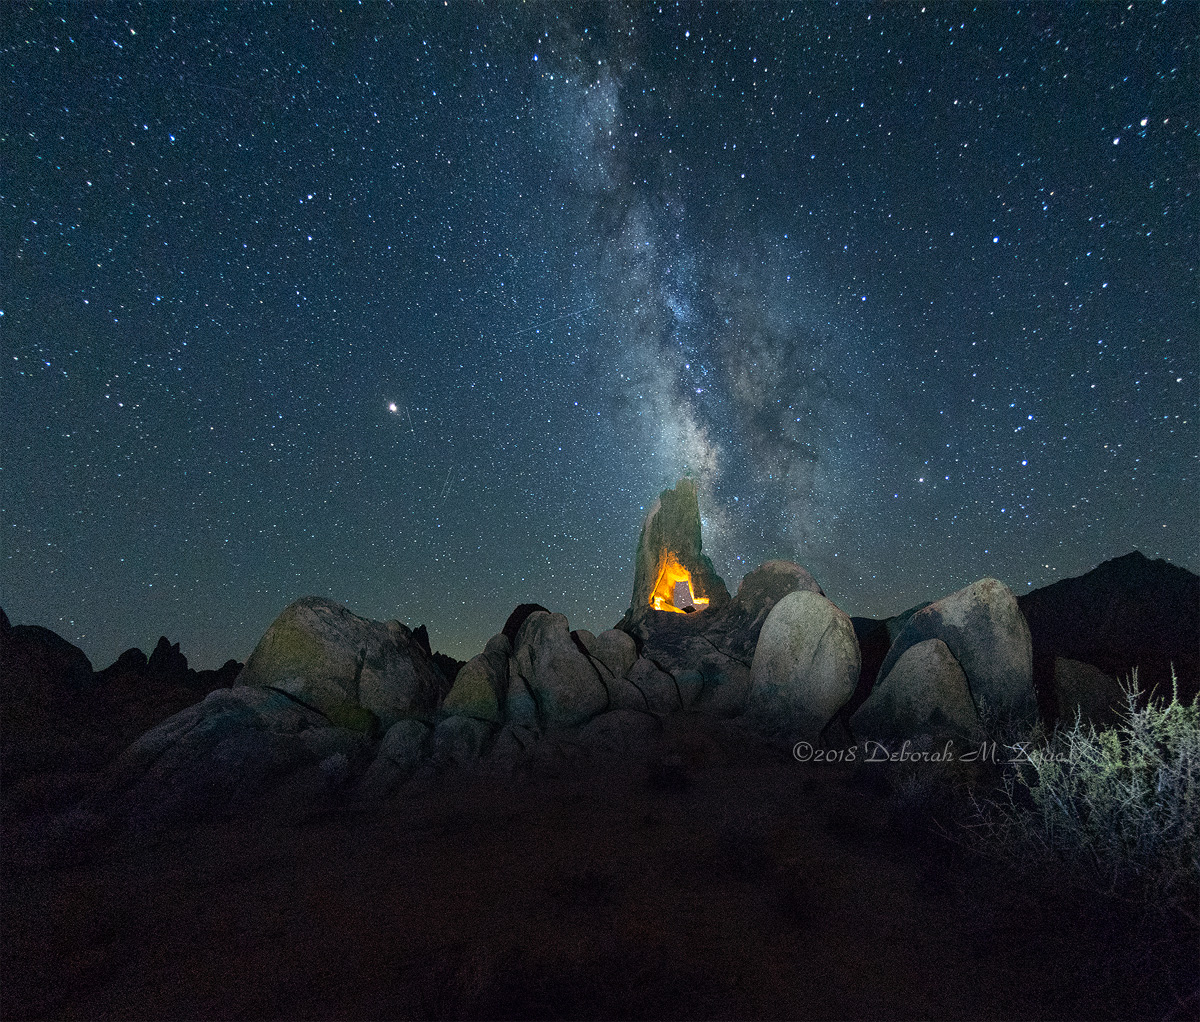
Some technical stuff… Mars is shining brightest in the sky on the left of the Boot and Milky Way, and in the dark lane of the Milky Way very near the left edge directly across from Mars is Saturn shining bright, out of frame was Jupiter too, but I cropped it out in favor of a stronger composition. Thank you Peter! He was the best teacher I ever had on cropping for the composition. When I got all my frames uploaded I saw that this one had several meteors or shooting stars in the frame. One heading into the Milky Way from the left, and one beside Mars, and two lower and to the right of Mars. They’re faint but there!
Did I tell you how chuffed I was?
The sky is filled with billions of stars out here. It’s breath taking, and I can’t explain in words how amazing, awesome, as well as beautiful it is, and just, How. Small. I. Felt while viewing it, and how just as I know it while standing on top of mountain that God is real and there. He was here too. This is my chapel, my cathedral, my Holy Place. This. THIS Feeds My SOUL.
It’s mid September now, so this is the last image I’ll be making of the Milky Way until next April or May. The Galactic Center…that wonderfully rich milky bit very close to the tip of Lady Boot Arch’s top is headed to the southern hemisphere now. It’s their turn to see the richest part of the arm of our galaxy. I will miss it, and yearn for its return as I do every year.
I am behind with emails, and blogs again, and I’m afraid I’m going to be behind for a bit longer. I will catch up!
I hope you’re all having a lovely week.
Nikon D810| Nikkor 16mm f/2.8 fisheye lens| Hoodman Steel Digital Film| PS CC 2018
more to come…
https://circadianreflections.com/2012/01/12/sunrise-in-alabama-hills/


You must be logged in to post a comment.