Add a little Sparkle to your day…

Copyright © 2013 Deborah M. Zajac  All Rights Reserved

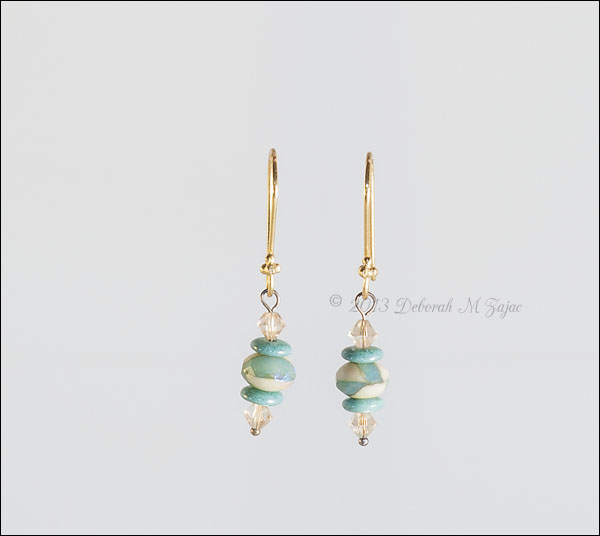
I had the whole day free so I played with my continuous lights and SB600 Speedlight. I bought a couple of pieces of jewelry recently  which started  me thinking about Jewelry Photography and lighting.  I am still trying to get more accomplished with external lights and photography and I hope this exercise will help me grow in that area.

After studying lighting techniques, and jewelry styling for a couple of days I got my props together and by  late this morning I was ready to start taking some photos.

Add a little Sparkle to your day

Sapphire and Diamond Pendant

Ear-rings

Rose Gold Ear rings I still don’t have the lights quite right for the sparkle I want.  I’m looking into getting a Dazzle Bulb for the future.  I also need another high wattage bulb. I’d also like to add some plexiglass sheets to my kit as well;  I see a trip to the hardware store in my near future.

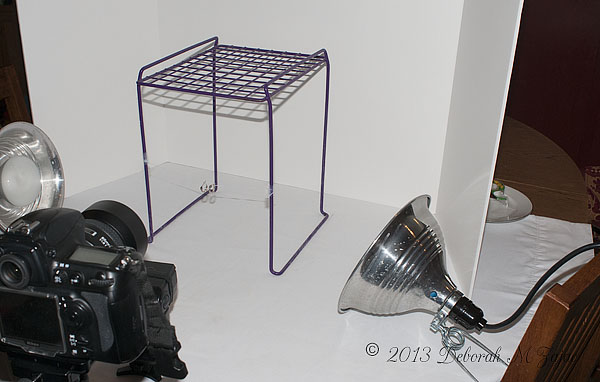
This is my tabletop set up. I set up on the kitchen table with a white sheet, white foam core board, and my lights. I had to hunt for something to tie dental floss on to be able to hang the jewelry and this is what I came up with. My daughters old high-school locker shelf. It came in handy after all these years of non-use.
I took the photo of the set up with a Nikon D300s and 24mm f2.8 AF-D and on-camera flash.

Camera and light set up for Jewelry ShootNikon D700| Nikkor 85mm f1.8 AF-D, and Nikkor 28-105mm AF-D| Continuous lights 1 full Daylight camera right, 1 soft light bulb camera left, SB 600 camera front

I did all the photo development/processing in Photoshop CS6.  All my processing starts in Adobe Camera RAW then I moved to Photoshop for levels adjustments, output sharpening, cloning out the thread that held the ear-rings and necklace, cleaning up dust spots, and adding my watermark then resizing for the web.

P.S. Several times today I wished I had a macro lens!

” My only true love, darling. I live for furs. I worship furs! After all, is there a woman in all this wretched world who doesn’t? ” Cruella De Vil in Disney’s 101 Dalmations

Copyright © 2013 Deborah M. Zajac. All Rights Reserved

live for furs. I worship furs! AI’m continuing to play with my Speedlight off camera. I have to re-learn how to set it up before I can use it if I let too much time pass between using it off camera. For this shot I used my homemade Snoot for the lighting on this.  This is my Homemade Snoot on my SB600.

DIY 7.5 in. SnootI made it with an old tea box, and Gaffer’s Tape

DIY 7.5 in. Snoot Project “How To” make my Snoot:

What I used and did
A tea box
Scissors
Box cutter
Gaffers Tape
Painters Tape
SB600 w/Finished Snoot

I cut the box to fit around the Speedlight then covered both the inside and outside of the box with Gaffers tape. I couldn’t find any Velcro in the house so I used Painters tape to temporarily close the Snoot around my SB600 Speedlight. I had planned to put Velcro on the seam so I can re-use the Snoot for future projects, but I never got around to that.

I think it works pretty well. These characters I’ve had stored since the 1990’s.

Woody Studies the SB600

Woody Studies the SB600, originally uploaded by dmzajac2004-.

Via Flickr:
Copyright © 2013 Deborah M Zajac. All Rights Reserved.

I’ve been using my SB600 Speedlight quite a bit the last month; on camera most the time, but did pull out my umbrella,and stand this past week-end to soften the light. It’s been so long since I last set up my Speedlight in Commander mode for off camera use that I had to get out my manual.

Inspired by two photographer friends who have been using some really cute toys as their photographic muses recently I dug out Woody to play with. The light is pretty boring in this shot I’m afraid. I wish I was as creative as Rubbah_Slippahs, and Nikki!

I want a Danbo!

D700| 24-70@62mm|f/3.2| 1/160s| ISO 640| Manual Priority| ISO 640| Eiko 4600K bulb & clamp light bounced though umbrella.

Here’s the set up shot:

Woody set up shot_4063


Smoke Gets in Your Eyes

Copyright © 2012 Deborah M. Zajac. All Rights Reserved.

What do you do on a rainy day and you’ve got an urge to break out the camera and shoot something? Try something new! About a month ago artist/photographer Linda Clower whose creativity, and talent I’ve long admired began experimenting with Smoke Photography. Her results are stunning, and I’ve wanted to try it myself since seeing hers.

I set my Nikon D700 mounted with a 35mm f2 lens on a tripod with the on board flash set to fire, and used a lamp on camera right. Using a couple of yards of Ultra Suede purchased for a DIY back-drop which I taped with painters tape to wall  then draped the excess over my sideboard to use as a base to set my incense dish. Setting the incense about a foot from the back of the backdrop I lit the incense, dimmed the lights and took a few shots. Below is my first attempt.

It’s rather soft. Not at all the crisp photo I had hoped to create, but I do like the surreal, and arty feel to this finished work.  However I wanted to be able to get the crisp shot I was hoping to capture.

I think the room was too bright. I decided to try it again on another day.

I woke up early motivated to try Smoke Photography again, but with changes. I decided to use my Nikon SB600 Speedlight instead of a lamp or clamp light, but I needed a Snoot to direct the light on the smoke. I’d seen DIY Snoots before and knew I had just about everything at home to make one so, I rooted around the kitchen cupboards looking for a box to make the Snoot. I found the perfect box in the refrigerator; a large rectangular tea box.  I cut it to fit around my Speedlight then covered both sides with Gaffers tape. Not having any velcro in the house to seal it closed around the Speedlight, and be able to re-use it in the future I used painters tape to close it. Soon I’ll purchase some velcro for it.

Here’s my DIY 7.5in Snoot

Now it was just a matter of waiting for evening when the light would be dimmer. The light got really dim outside due to rain clouds so I closed the blinds and set this up then started shooting before the sun came out again.I changed my set up this go round. Here’s the set up I used this afternoon D700 mounted w/35mm f2 lens, hand-held. I moved the lamp(camera right) closer, and I tried to keep the light from spilling onto the back with the shade. I wanted the light from the lamp to light up the smoke so I could focus on it and get the crisper shot. The Snoot was camera left.  My settings were: ISO 800, f11, 0.3 seconds, Manual mode, and manual focus.

I’m much happier with this result.

Nikon D700, D300s, 35mm f2, and 50mm f1.8

Here are some tutorials that  I used to  help me create this shot and  get some help with post editing.

http://www.youtube.com/watch?v=Iv39UmuiYNA&feature=player_embedded#!

http://www.sublime-light.com/index.php/2007/06/14/smoke-part-2-how-to-process-smoke-photographs/

http://www.youtube.com/watch?v=J2d281_HoEQ