Whatever Weds. A Starlit Night

Copyright ©2024 Deborah M. Zajac. ALL RIGHTS RESERVED.

PLEASE DO NOT USE MY IMAGES WITHOUT EXPRESSED WRITTEN PERMISSION.

It’s that time of year when I yearn to be out imaging and gazing at the night sky. A friend and I went back down to Mono Lake to do just that. Thankfully, we didn’t have any clouds to worry about.

Milky Way the Great River in the Sky

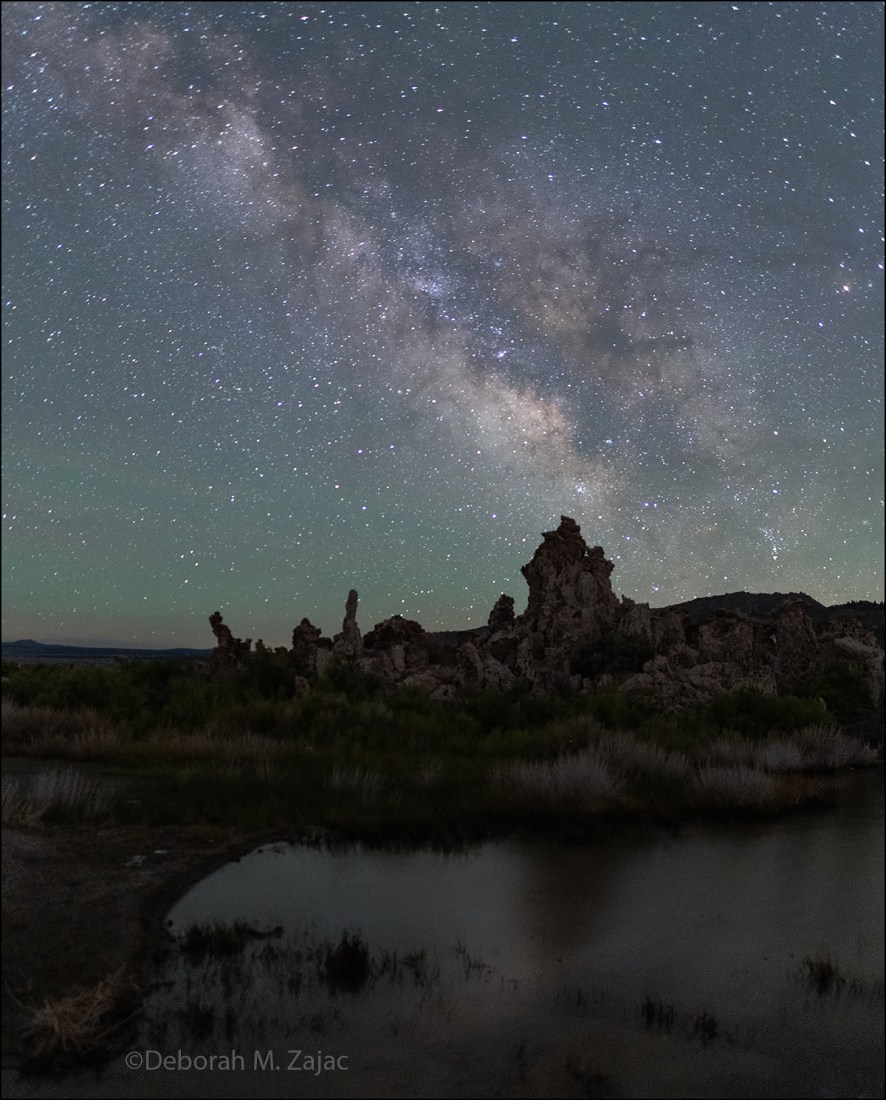
The lake is really high eliminating a lot of the beach area we learned from our camping trip last month so, we knew to take our tall boots because standing in the lake might be our best bet for imaging. We scouted in the afternoon and found this spot. When we were leaving for dinner we ran into a Ranger who told us she would be giving a talk on the summer sky and constellations that evening on the beach and invited us back to attend it. We said we’d be there. The talk was a fast 2 hours. It was great hearing the stories the Native Americans tell about the stars and how they named the constellations and how to find them . The talk ended just after 10PM which was perfect as the Milky Way was already visible and we had some time to get to our spot in time for the Galactic Center to rise. The Galactic Center is the central region of our galaxy. The best months to photograph the Milky Way in the Northern Hemisphere are from May to August when the Galactic Center is highest in the sky and the weather is usually better in the warmer months.

We were standing in water to photograph this scene, but it wasn’t very deep, and the waves were gentle so we didn’t have to worry about a big one coming along and getting into our boots. 😊

I got home about lunch time yesterday, unpacked, got the car washed, and then started getting ready for a visit with my son and daughter-in-law. I’ll be on and offline for a bit. I hope your week and summer are going well.

Nikon D850|Nikkor 20mm F1.8G|

more to come…

Annular Solar Eclipse May 20, 2012

Copyright © 2012 Deborah M. Zajac. All Rights Reserved.

Several friends and I went to the Nevada desert to view and photograph the Annular Solar Eclipse from the centerline.
After weeks of calculations to determine the best spot to be on the centerline, and be doable in a day we had a couple of choices and nailed down our final choice Sat. Thanks to Rico’s, Phil’s, and Andy’s awesome calculations we were spot on the centerline.
As the afternoon wore on more photographers, and Eclipse viewers gathered around us to view the celestial show. One guy hiked up with a huge telescope. Kids big and small liked looking though that.

Here’s where we were based. That guy down there with the hat is setting up his Spotting Scope. There were cameras, lenses, and telescopes of all sizes. Some folks came out just to view it.

Wearing the right eye gear!


It was work for me. I don’t own a motorized tracker so I had to manually track the sun, making adjustments every 1-2 minutes for the entire 2.5 hours of the Eclipse.
It was worth the effort.  This is also the first time I’ve photographed an Eclipse from start to finish then process the phases in Photoshop. It may be a bit uneven…forgive me! I couldn’t get my guides to work in my workspace so I eyeballed it.  I am pleased I was able to do this at all. I need to give a shout out to PJ for reminding that copy/paste works to do a step I needed too. Thank you!

Looking at my Poster are the phases of the Eclipse. Starting on the left is the beginning of the Eclipse with the “Ring of Fire” in the middle followed by the final pass of the Moon as it made its way across the sun. If you look close you can see the Sun Spots! It was the neatest thing to see from start to finish.

Our little group setting up and getting ready to shoot the Eclipse. I’m off to the right in the hat.  Although that man behind me wasn’t part of our group. He was a spectator who said he’s traveled all over to view Eclipses.  Thank you Rico for the Photo!

And to my traveling and planning companions THANK YOU, Anne, Dali, Phil, Steven, Andy, and Rico for a great day!

Nikon D300s| Nikkor 80-200mm + Tamron 1.4x TC| Manual Priority| Tripod| various shutter speeds, ISO 400| f11

more to come…

May 12, 2012 Sun

May 12, 2012 Sun, originally uploaded by dmzajac2004-.

Via Flickr:
Copyright © 2011 Deborah M. Zajac. All Rights Reserved

I haven’t had as much time as I’ve wanted to practice using my Solar filter and I haven’t tried a time-lapse with it yet either. Too many gray days, and other
distractions have been in the way.
The Solar Eclipse is this week! I hope to get more practice before Sunday’s event.

Yes, even though I left home without my Teleconverter I did get the sunspots.

I’m using this Solar filter:

http://www.telescope.com/410-ID-Orion-Full-Aperture-Solar-Filter/p/7733.uts?keyword=solar%20filter

Don’t try to capture the Eclipse without using proper protection for both your eyes and camera! Get a filter made especially to view the Sun! Time may be running out for you pick up a filter I recommend calling around and if you find one jump on it. I bought one that fits the end of my lens hood.

Nikon D700| Nikkor 80-200mm @ 200mm|
Costa Mesa, California, Afternoon, Sunspots, AstroPhotography

In the Face of the Sun

Copyright © 2012 Deborah M. Zajac. All Rights Reserved.
“To fling my arms wide
In the face of the sun,
Dance! Whirl! Whirl!
Till the quick day is done.”
~ Langston Hughes-Dream Variations Sunrise over Lick Observatory San Jose California
Last week on the 21st of March several friends and I rose before dawn to meet to photograph the Crescent Moon rising over Mt. Hamilton, and James Lick Observatory in San Jose, CA.

We also knew that shortly after the Moon rose the sun would also rise over
Mt. Hamilton, and the observatory, but we needed to change our location
to get the angle right. Arriving at our chosen place; a wide open field that once was a neighborhood, long torn down;

the only reminders were the scars of streets, foundations, and the trees, shrubs, and grass which dripped with morning dew.

We walked carefully through it avoiding the holes that housed the Gophers who reside there now until we found just the angle that faced the Rising Sun.

We set up our tripods, camera gear, and we donned special armor this day; a filter to protect and shield our sensors, and eyes.

Then we waited and watched the brightening sky for the first little glimmer of the golden halo that announces the rising morning star!
Blended double processed frame + 1
Nikon D700 & D300s| Nikkor 80-200mm + Tamron 1.4x Extender
How I made it
When I took the photograph I used a Solar filter which protected my camera’s sensor, and my eyes.
This is what it looks like RAW from my camera. I really like all the foliage in silhouette, but I knew in order to recover the color
of the sun I would lose all that detail.
I wanted a finished photograph that included the silhouetted foliage, and color in the sun.
To do that I would have to blend or combine at least 2 frames. I made a copy of the negative above then uploaded that into my photo editing software Lightroom 4.
Then I removed all the color and silhouetted foliage in order to recover the sun’s color.
Once that was done I had this frame. I made another copy of my original negative then uploaded both it,
and the edited negative above into Photoshop CS5 where using layer masks I blended the two frames together.
It was pretty, but I thought it lacked something to make the composition balanced, and a bit more interesting so I added a Golden Eagle.
A photo I had taken back in January of this year. I cloned out the sun flare spot, and added my copyright signature et Voila! Fini!
My companions that morning have published their photos from the morning which
you can see by following the links here, here, here,and here,