Copyright ©2017 Deborah M. Zajac. ALL RIGHTS RESERVED
I didn’t have anything planned this week-end because it was raining in the morning on Saturday, and when that cleared out for a few hours break before the rain returned that evening He-Man, Diva Dog, and I went to stretch our legs in the hills. We went up down the hills walking about 3.1 miles then we were slugs the rest of the day.
Today, Sunday I wanted to photograph water drops and splashes. It’s been raining so much I guess I have drops and splashes on the brain. 🙂
After breakfast and my first cuppa tea I set up my kitchen sink with diy water drop rig.
I thought others might like to know/learn how to do it so, I have written down the gear, and steps I used to achieve the images below.
In the first image below I have my trusty Nikon Df with my Nikon SU800 wireless trigger mounted on it, and both are mounted on my travel tripod. On a light stand next to that is my Nikon SB600 speedlight. I was shooting tethered using Lightroom’s Tether Capture feature on my laptop which is just out of frame.
I attached a doggie bag filled with clear water to the faucet with a rubber-band. I poked a little hole in the bag to drip into a bowl filled to the brim with water.
Under that is a colorful beach towel to create nice colors in the water, and catch any splashes and or spills. The little spoon behind the faucet I used to focus on by placing it in the bowl where the drops were falling then focused on that and switched to manual focus. The lens is a Nikkor 105mm Macro lens.

iPhone 7 Plus
I took a few test shots to get shutter speed, focus, and exposure set, then started trying to time the drops to get a few nice drops and splashes. You need to shoot a lot of frames to get the timing just right.
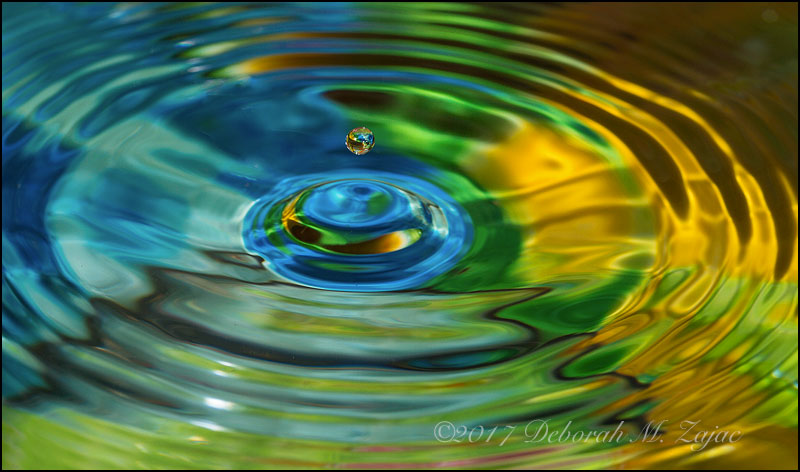
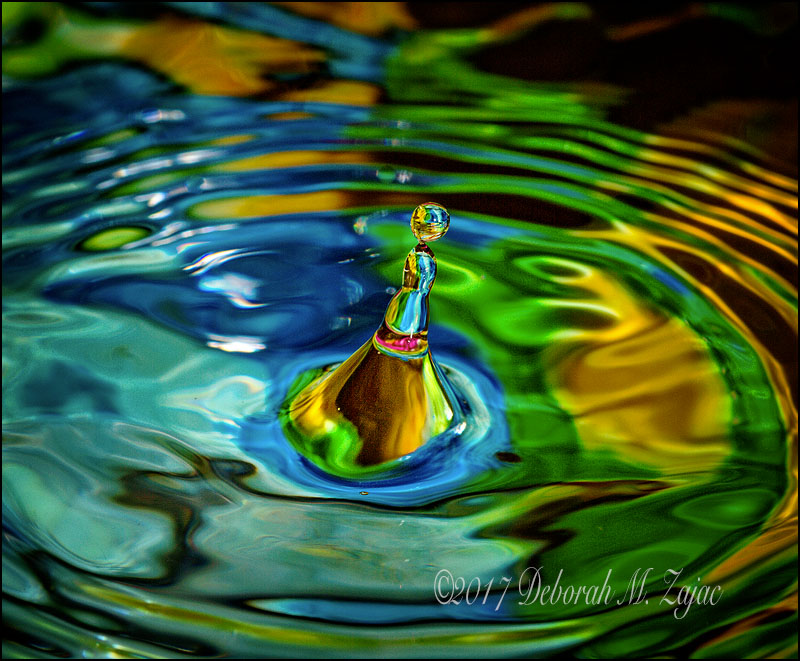
Here are a few of my favorites:
Suspended
Balancing Act
SPLASH!
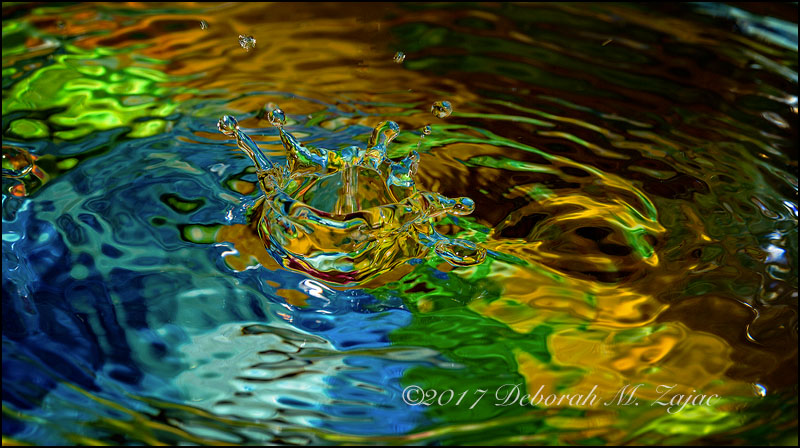
Settings: I used F/16 and F/18, 1/1000s and 1/1600s, ISO 100, Manual Priority|Matrix metering| Manual Focus: I developed these 3 frames in PS CC 2017 & On 1.
I shot about 100 frames then transferred them all to a memory stick to upload to my desktop computer. Once there I culled the images down from 100 to 33.
It has been 3 yrs since I last set up to shoot water drops and splashes (here). I forgot how challenging and fun it is trying to catch the drops and splashes at just the right time.
You don’t need a Speedlight or wireless trigger to make this type of shot. A continuous light bulb in a shop clamp light would work! You’d probably want to diffuse it with some tracing paper, velum paper, or shear white shower curtain though. Be aware that bulbs can get very hot so keep your diffusing material several inches away from the light!
I hope you found this interesting, and I hope you give it a go! If you do let me know how you did and please post your images. I’d love to see your results!
More to come…

HI Deborah,
Hope you are feeling better. I just now mentioned this post on Macro Monday because this is the week for macros of drops and splashes and I believe this post is a wonderful resource. So you may get some visitors. The mention is at https://www.flickr.com/groups/317988@N20/discuss/72157682077806943/72157684933621496/
I hope to try this out soon.
Nancy
LikeLiked by 1 person
Oh neat! Thank you for sharing my set up. I hope you try it for the challenge this week.
LikeLike
The coloured background is a good idea. Looks great. You pictures turned out great. We have been trying drop shots lately and its not easy 🙂
LikeLiked by 1 person
Thank you so much! It’s not easy is it. I hope you got more keepers than I did though. 🙂
LikeLiked by 1 person
Great shots, beautiful creations!
LikeLiked by 1 person
Thank you so much John!
LikeLike
I love the colors!
LikeLiked by 1 person
Thank you Cheryl! I’m so glad you like the colors.
LikeLike
They’re really great shots.
LikeLiked by 1 person
Thank you Cheryl! You’re too kind really!
LikeLike
Do you like your macro lens? I have always wanted one but hubby keeps researching and saying most people say it is a waste of money. The all purpose standard lens should suffice but when I use it the clarity just isn’t there and I have to get physically close for macro. It won’t zoom. My zoom does a great job but of course tou can only be so close. It works for 99% of my shots because of the nature of my photography. But I also love macro shots.
LikeLiked by 1 person
I really like my macro lens, but I didn’t have one for years. I did want to get closer to subjects so bought a set of extension tubes. Those are fun and you can get ridiculously close with all 3 tubes mounted, but the working distance is inches and the depth of field is super shallow. I like using one tube at a time.
There’s also Close Up lenses you can get that are super easy to use and carry. They’re like a screw on filter that you add to the front element of your lens. I bought the Canon 500D Close Up lens in filter size 77mm and bought Step-Up rings to fit the lenses I wanted to used it on. Then I bought generic lens caps to fit over the lens/filter when mounted on my camera.
https://www.bhphotovideo.com/c/product/87503-REG/Canon_2824A001_77mm_500D_Close_up_Lens.html
You can get substantially closer to your subjects with that close up lens.
When I bought it I would use it with my 70-300mm and 180mm lenses a lot. The 70-300mm had a minimum focusing distance of 4.5ft but with the close up lens on it I could get within 2 ft of a subject! The same with my 180mm. I carry it with me all the time. Today I use it on my 80-200mm, 300mm f4, 17-35mm, 105mm macro, well all my lenses! 🙂
I bought my macro lens after owning the tubes, and close up lens for several years. I am a Nikon user and bought an older used version of the lens from a reliable used camera store. keh.com
It has auto focus, but no image stablization. It’s super sharp, and pretty fast to auto-focus on my camera bodies. Are you Nikon? I bought the Nikkor 105mm micro f/2.8 AF-D lens. The current version has VR and no aperture ring. It’s called Nikkor 105mm micro VR f/2.8 G AF-S or something like that.
Nikon calls their macro lens Micro.
I recommend renting a macro lens first to see for yourself how much sharper the IQ is, and how close you can get. There’s a bit of a learning curve with all lenses so give yourself a week or more to play with one.
I have a set of images on my flickr site using the extension tubes, and close up lens if you want to see what I did with them.
https://www.flickr.com/photos/dmzajac2004/albums/72157624143751402/with/14625505533/
You can search for other users of Extension tubes, and the close up lens. There are so many amazing photographers out there doing amazing work with these tools.
I took the long way around to say YES! I like my macro lens, but there are other options you can get to make some close up/macro images while you’re on the fence about getting one.
I hope that helps and if you have any more questions just ask!
LikeLike
Thanks so much for all the. Alusble info! It is ver helpful. I have a Nikon D 7000
LikeLiked by 1 person
Oh, your camera has a built in focus motor so you can use the 105mm micro f/2.8 AF-D version of the lens and have auto-focus! You can find used ones in Like new or excellent cond. for under $450 now.
Of course most the time you’d be using manual focus when shooting things really close up. 🙂 But having the option of auto-focus is a plus!
One thing to keep in mind is working distance. If you want to photograph bugs the more reach you have the less likely you are to scare the bug away. If you were to get a 45mm or 60mm macro you’d have to be right on top of the bug to photograph it. The 105mm is a good reach, and is great for bugs, flowers, food, portraits, and on your camera it would be a good mid-telephoto lens too.
A 3rd party macro lens that is really well liked is the Tamron 90mm macro lens. My good friend has one and I’ve used it once for an hour. It’s lovely lens. His has a really nice softness to the Bokeh that I love.
LikeLike
Thank you so much for the great tips. I reslly appreciate it.
LikeLiked by 1 person
anytime!
LikeLike
I love looking at ‘behind the scenes’ pictures. You would have never guessed that is how you took these amazing photos! They are truly beautiful 😀
LikeLiked by 1 person
Thank you so much Antonia!
LikeLiked by 1 person
These are great. Love the colors and stopped action.
LikeLiked by 1 person
Thanks Robert! I’m so glad you like them.
LikeLike
These turned out amazing! Thanks for giving the tutorial. 🙂 I’m still learning the technical aspects of photography so I appreciate it so much when others share how they created their work.
LikeLiked by 1 person
Thank you so much Amy! I hope it helps you out someday.
LikeLiked by 1 person
OMG I love these Deborah! Thanks for sharing your techniques, I am going to have to try this one of these days!!
LikeLiked by 1 person
Thank you so much Donna! I hope you do try it. It’s fun, and makes neat images. I may print the single drop to see how it comes out.
LikeLiked by 1 person
This is awesome! I love the suspended drop and the balancing act. The colorful fabric was ingenious, Deborah. I appreciate your time to demonstrate how you produced these photos. They are “magazine worthy!”
LikeLiked by 1 person
Oh thank you so much for such a lovely compliment and comment Robin! I’m glad you liked the post and images.
LikeLiked by 1 person
I travelled backwards to your raspberry dropping into cream post (via comment to Joanne above. . .) I enjoyed that stunning shot. Delicious perfection!
LikeLiked by 1 person
Oh thank you so much for looking and for the lovely comment Robin!
LikeLike
I love these photos, Deborah and I really appreciate the information you gave us (especially those of us without all the gear). My boss, when I worked for Weyerhaeuser in Seattle, had studied with Professor Edgerton at MIT. He had the famous milk (I think) drop print on his wall. I like your water drop much more because of the color and the crystal clear nature of the drop.
LikeLiked by 1 person
I have wanted to do a double milk drop, but need a special adapter/contraption to make the double drop. I was telling Joanne I have done milk splashes with a raspberry once. That was fun! That image you can see
https://circadianreflections.com/2014/02/03/652-raspberry-and-cream/
I’ve wanted to do that again too.
LikeLike
That’s a really cool photo too!
LikeLiked by 1 person
Thanks!
LikeLiked by 1 person
oh, I meant to say THANK YOU as well! 🙂
LikeLiked by 1 person
NICE! I love the creativity behind these shots, and aren’t they beautiful. Well-done! 🙂
LikeLiked by 1 person
Thank you so much Melissa!
LikeLiked by 1 person
Beautiful pictures! I loved seeing the ordinary things that went into creating the magic. Thank you so much for taking us behind the scenes with you. Which one is my favorite? ALL OF THEM! 😀
LikeLiked by 1 person
Thank you so much Marian!
LikeLike
That’s really clever. Deborah, well done, they’re all brilliant 🙂
LikeLiked by 1 person
Thank you so much Phil!
LikeLiked by 1 person
I love the tutorial, Deborah. The towel was genius.
LikeLiked by 1 person
Thank you so much John!
LikeLiked by 1 person
🙂
LikeLike
What a stroke of brilliance to use a brightly coloured background. I love the effect it created with the waves caused by the drops. I’m assuming you’ve experimented with different colours in the past.
These are great shots – my favourite is the first one.
LikeLiked by 1 person
Thank you so much Joanne!
You asked, ” I’m assuming you’ve experimented with different colours in the past?” Yes, I have used the same beach towel years ago, but had it placed so more of the pink, yellow, and blue were the prominent colors in the water, and I used red fabric, and once I used milk instead of water and dropped raspberries in it for splashes! 🙂
It’s quite common to use food coloring to color the water for these types of shots, but I didn’t want to stain the towel or have even more of a mess to clear up.
LikeLiked by 1 person
Wow – I bet the raspberries were amazing! They have all that wonderful texture against the milky white and I can picture the big splash in my mind’s eye 🙂
LikeLiked by 1 person
Here’s the link to my Raspberry milk splash.
https://circadianreflections.com/2014/02/03/652-raspberry-and-cream/
Does it look how you see it in your mind’s eye?
LikeLike
Holy Cow! Yes! Look at all that lush, spiky raspberriness ❤
LikeLiked by 1 person
🙂 It was fun to do.
LikeLiked by 1 person